In here
Biographical
Interests
Leisure
Services
Portfolio
Contact
Copyright
© 2011 by
Klaus Nordby.
All rights
reserved.
Klaus Nordby's militantly dull homepage
www.klausnordby.com/ego/xara.html
In here
Biographical
Interests
Leisure
Services
Portfolio
Contact
Copyright
© 2011 by
Klaus Nordby.
All rights
reserved.
Out there
Friends
Commentary
Web design
Graphics
Computers
Painting
Photography
![]()
06-Jan-08
22:49
Xara X: Air-brushing with transparent vectors
Introduction
Editorial remarks
In 2000 I was commissioned to write this article on CorelXara 2.0 for c't, Germany's leading computer magazine.
The German version totalled about 10 printed pages and was published in the summer of 2001, issues 14 & 15. I retained the rights to the original English manuscript and, after a suitable waiting period, it is hereby published on the web for the enlightenment of . . . everybody.
The illustration and the article were mostly done before Xara X 1.0 was released (spring 2001) and the screenshots are therefore taken from CorelXara 2.0. But not much has changed in the UI, so I have not (yet) updated them. Some of the text is perhaps a bit dated too, as several features were added in Xara X which I would have used if they had existed, but the text does, I hope, reflect all the capabilities of Xara X 1.0.
I regard this version here as the real article, not the c't-published version. I wrote my manuscript in English and the c't editors translated it into German — and eliminated a lot of my small, personal touches so that the article would fit in with their emasculated editorial style.
If you find errors in the text, please email me. Thank you!
All text and images copyright © 2001 by Klaus Nordby. All rights reserved.
Illustrators wanting to use computers as a tool must choose between working with two fundamentally different types of programs: painting or drawing programs — more technically known as bitmap and vector programs.

Painting (or photo editing) programs — such as Corel PhotoPaint, Adobe Photoshop and MetaCreations Painter — allow the artist to draw and paint with digital tools which, just like physical pens and brushes, allow for great expressiveness and subtlety in "paint handling". However, it is awkward to do precise work with such programs — and nearly impossible to make changes to the colors and textures of painted areas once they have been applied. Furthermore, all paint programs must use pixel-based file formats, which means that the art, once created for a definite printed size, cannot be enlarged much without producing blurring or jaggedness. And making a bitmap illustrations for large-print formats can be very slow, as such files will be physically huge and require a lot of both CPU power and RAM. (Compressing bitmap files will only do you good in terms of hard disk storage: when opened in the paint program, they will take up as much RAM as whatever the huge number of pixels require — there is no escape from this physical, mathematical fact and there never will be. Granted, there are special bitmap editing programs, such as Macromedia xRes, Satori, Wright Design, Live Picture and Altamira Genuine Fractals, which all try to overcome these drawbacks in various clever ways — but they are not magic wands either and their use generally involves other problems.)
The other main type of software available to illustrators is vector drawing programs, a list that includes CorelDraw, Adobe Illustrator, Deneba Canvas, Macromedia Freehand and Creature House Expression. The advantage of using such tools for illustration is the ease and speed and precision with which one can geometrically "construct" the many colored shapes that together add up to a visual image. The information in the file is not stored as millions of unyieldy pixels, spread flatly out all over, but as a relatively small number of mathematically scalable shapes, which can also easily be changed individually and moved behind of and in front of each other. Such files are therefore not resolution-dependent — they can be enlarged almost indefinitely, without becoming unsharp or jagged — and the files are also quite small, both on the hard disk and in terms of RAM usage in their open state. The disadvantage has been that vector illustrations, consisting as they do of hard, enclosed shapes and lines, almost inevitably get a cold, mechanical and "hard-edged" look to them. Such a look is fine for some uses, but the traditional-media illustrator may feel unduly inhibited by the way these tools constraint his style. They may even make it impossible to match the complex kind of illustrations he can create the old-fashioned way, with paints and brushes and air brush on cardboard.
But about five years ago, a new vector program appeared, which — for the first time ever — made it possible to combine the soft, sophisticated look of paint programs with the sharp, precise look and ease of use of vector programs: CorelXARA for Windows. It has now been released in an updated version, called Xara X and, while the other vector illustration programs now have copied some of its original features, it has still not been surpassed for speed or ease of use. which — for the first time ever — made it possible to combine the soft, sophisticated look of paint programs with the sharp, precise look and ease of use of vector programs: CorelXARA for Windows. It has now been released in an updated version, called Xara X and, while the other vector illustration programs now have copied some of its original features, it has still not been surpassed for speed or ease of use.
The CorelXARA Revolution
While CorelXARA was — and the newly released version, called Xara X, still is — fundamentally a vector program, it can easily import large bitmap images and use them in complex combinations with vector shapes as fill, background and patterns. There was nothing new about that, as use of bitmaps in vector programs had been possible at least since CorelDraw 3.0. But what made the original CorelXARA so special as an illustration tool was really just this one feature: its ability to create transparent vector shapes — and have as much control over the transparency attributes as over the color.
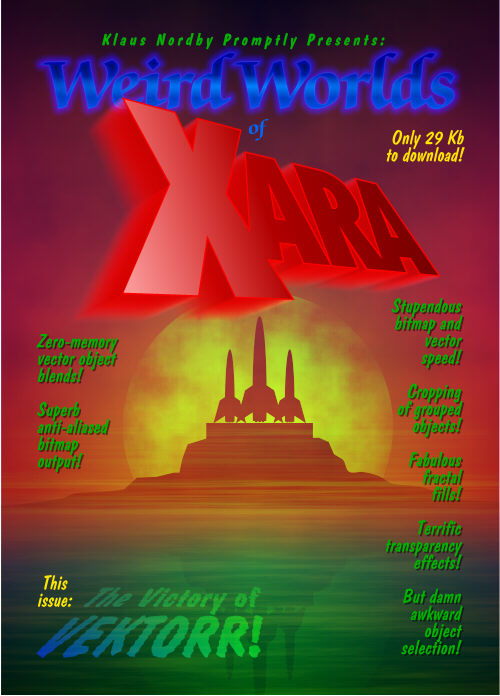
This is what really sets CorelXARA apart from the crowd, as such transparency makes it possible to create a great range of subtle, bitmap-like effects with the ease and speed of vector tools — as we shall shortly see. But it also introduced many other great innovations:
● Adjustment of the characteristics of color gradation and transparency directly on-screen, without having to enter numerical information in control boxes
● Great customization of the user interface
● Superb anti-aliased screen images
● Trouble-free export of large anti-aliased bitmaps
● Cropping of grouped objects, vector and bitmaps
● Very compact disk files
● The ability to fine-tune colors at any later stage (and not just when first applying them to objects)
● Step-free color gradations
● Blazing speed

On my screen-redraw tests, the bane of all vector programs, CorelXARA was at least 10 times as fast as CorelDraw on redrawing the same illustration! On top of all, it was even a very stable and almost crash-proof program, with a hard-disk footprint of only 11Mb! A rare bird indeed in the Windows graphics world. Now, more than four years after the release of version 1.0, some other vector programs have caught up with most of these innovative features, but Xara X still has a polished "feel" — and speed — which the others cannot match. Admittedly, the program does have a few deficiencies in the areas of keyboard shortcuts, pre-press printing and object editing, but these are relatively minor points. After having used Xara X for a little while, using other vector programs will feel like driving old, clunky trucks, whereas using Xara X feels like driving a fine, sleek sports car.
In the rest of this article I shall demonstrate where this Ferrari of the illustration programs can take us, by prying apart my "Microscope" illustration. I had created this piece long ago as a traditional air-brush illustration for a book cover and when I bought CorelXARA I decided to see if it would now finally be possible to create first-class air- brush art on the computer.
It was.
Basic Techniques
Let us start with something that's very simple in any vector program: drawing rectangles and ellipses. I used these to build what is, in reality, a fairly simple metal tube: the ocular of the microscope. Illustrations 1a to 1h show the basic steps involved and will serve as an introduction to working with Xara X.
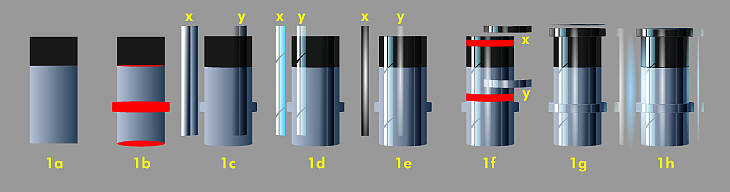
In 1a I first draw a plain near-black rectangle, copy it and paste it in the same place, move it down a bit and stretch it down vertically. Then, using the Fill gradation tool, I make a horizontal color gradation from a light bluish-gray to a dark bluish-gray. I assign unique names to these new colors: "Tube light" and "Tube dark," which will make it easy to locate the colors for this object later in the Named Color Palette and fine-tune their color values (but more about this later).
The red shapes in 1b are used to "pad out" the basic shapes. To ensure that the new red rectangle is perfectly centered, I just copy the blue-gray rectangle, paste it in the same place, shrink the height a lot — and, while holding down Shft to constrain it symmetrically — I pull it out to make it a bit wider. (This method of centering a copy is much faster than using Xara X's Arrange function, which is unfortunately a bit awkward.) Then the red rectangle is Added to the blue-gray rectangle to create the ring-like protrusion of the tube, as seen in 1c . The red ellipses are then Added to the rectangles to create the roundness of the real-world tubes. Making new objects in this manner — by Adding, Intersecting or Slicing primitive shapes — is a very powerful and fast way of creating complex shapes — often highly preferable to drawing them with the manual vector drawing tools. (A slight annnoyance is that this method will often create redundant vector nodes and it may often be desirable to do some node editing.)
Terrific Transparency
Now let us get started on modeling the shape and "material" of our presently very dull and unconvincing metal tube. In 1c, at the object marked X, we can see two very narrow rectangles, with gradated colors from white to dark gray. When first drawn and colored, all objects are opaque — as all vector objects were before the advent of Xara X — but now I select the objects and make them transparent with the Transparency tool.
Xara X has three major types of transparency (10 in all), which can be adjusted in power from 0% to 100% and it is very important to understand their respective characteristics, so let me briefly first discuss some theory.
The "Normal" mode, seen in A,is like placing sheets of paper with varying degrees of opacity on top of each other: colors will mix — so that sky blue and yellow will make green — but the "whiteness" of the paper will also be visible to various degrees, producing a milky, fog-like effect. "Stained glass" mode, in B, is like placing sheets of perfectly clear photographic filters — or stained glass! — on top of each other: as you add filters, the "heap" grows progressively darker. Here also, sky blue and yellow will make green and this is the kind of color mixing which is known as subtractive. The third mode, "Bleach," in C, is the hardest to understand — but also the one which is the most useful one in creating sophisticated lighting effects, because this is how light mixes in reality. Using this transparency mode is like painting with "light beams," and the — to artists seemingly strange — principles of additive color mixing apply: adding colored objects will progressively lighten the "heap," so that adding yellow to sky blue now will produce pure white!
2D versus 3D illustration
Many might ask: given all the work it entails creating both the vector objects and the "lighting" in 2D art — why did I not instead model the microscope in a 3D program and thereafter just light it the way I wanted? Would not that be both easier and better, given that I was aiming for a — seemingly — very realistic look? My objections to using 3D programs for advanced illustration are twofold, one technical and one aesthetic.
First, all 3D programs share a technical limitation with regard to painting programs: they produce resolution-dependent image files. A finished rendering of a 3D scene image may be 1,000 by 1,600 pixels — and that severely limits the usable size. Of course, one can always choose to render a scene with many more pixels — but that does not end the problems: the 3D models themselves must be modeled from the start using a finite number of polygons — quite unlike vector objects — so that at some point rendering a scene at larger sizes will simply reveal the "joints" between the polygons. And 3D programs are all notoriously slooooooooow to work with, if one wants to model with many polygons and/or render scenes at large sizes.
But even this I might have put up with, as computers get faster all the time (though never as fast as we want!) — but there is an inherent aesthetic problem with 3D which will never go away: it is too much like building models in the real world and photographing them. As such, this way of making illustrations are subject to most of the limitations besetting photography. For instance, lights from a light source will mechanically produce a certain inevitable modeling effect on an object; colors and textures are also subject to such mechanical-optical laws, etc. But in 2D illustration the artist creates all aspects of the light, colors and textures — and so can rise above the mechanical laws of optics. For the Microscope illustration isn't nearly as "realistic" as it may look to the naive eye: there are tons of light effects and shadings in it which could never occur in reality — or in photography or 3D programs. Yes, there are certain things one can do in 3D which photography in the real world cannot do, such as using point lights which do not cast shadows — but the differences tends to stop around there. While 3D programs of course can be a great tool for many uses, such as working out perspective and compositional matters, 3D illustration is ultimately a mechanical art — which is an oxymoron.
In sum, this is why I will always prefer 2D to 3D illustration: in 3D, the artist is never more than a great model builder and photographer — but in 2D the artist is God.
That's the basic theory of Xara X's transparency feature — let us now look at some simple uses for this. In 1c the two opaque rectangles are made "Stained glass" transparent — and at Y we see how the colors underneath show through them, making for a hard-edge type of shading. At location X in 1d I draw — using simple rectangles and some manual vector drawing — four shapes which make up a "window reflection" object. The four shapes are Combined to one whole object and gradated color from white to sky blue is applied. The object is now opaque: it obscures the gray background. Then I make this object "Bleach" transparent — and object Y in 1d shows how the object now interacts with the background colors: the colors of the top object do indeed "bleach" out the underlying colors. In 1e I have moved the "window reflection" object into place and voila — it makes for a very neat window highlight!
I then begin to make more highlight reflections. The thin rectangle at location X in 1e is given an elliptical color gradation from white in center to black at the edges. I make it "Bleach" transparent, move it to the middle of the tube, and we now see how the roundness of the tube is becoming fairly apparent — as well as its metallic-like surface.
Then I move on to adding some details to the basic tube, namely the wider part on the top and the ring around the metal tube. The red objects in 1f are drawn and used to Slice out parts of the underlying work. At location X and Y we see how I have made sections of the existing black and metal tubes — and in 1g these little section are enlarged a bit and put in place. I also draw a very thin black ellipse, as a top for the ocular. Finally, in 1h I add some more light effects to the edges of the tubes, using the "Bleach" transparency technique already shown in 1d-e and some very thin dark and light lines along the edges of the various parts. Such tiny details add a lot to the realism of any image and further help to avoid that flat, dull, mechanical look.
While I want the ocular to be angled in the illustration, note that I have drawn everything upright — simply because it is much easier than drawing anything at an angle. So finally I Group everything and angle the whole tube sideways, say, 30 degrees for a start. I make sure I write down all rotation angles somewhere in the file, so I can easily set things aright should I want to tinker with some details (which I always do, unfortunately). But using the Constrain Angle function — by holding down the Ctrl key — when rotating objects is by far the easiest way to "remember" any angle and in Xara X's Options I usually set a default angle of 15 degrees.
Creative Cannibalism
One of the great time-saving features of vector programs is their ability to easily reuse objects — to cannibalize one's own work, either from the same file or from something one has created before (as we saw with parts of the ocular). Whatever one creates can easily be copied and thereafter nearly infinitely scaled up or down and stretched and squeezed without ever affecting image quality — quite unlike pixel-based painting programs. But Xara X's capabilities goes far beyond this, as demonstrated in figure 8 below: the complex lens head of the microscope.
I first copy the metal tube from the ocular and use that tube for most parts of the lenses — taking care to appropriately redraw the perspective, of course, by drawing the proper types of ellipses. The slanting edges, for instance, are made by first using the Slice function to cut down the height of the tube, after which I use the Mold tool to squeeze the tube's lower end narrower. Note that if I had just shrunk the whole height of the tube, the slanting "bars" in the window highlight object would have been squeezed almost flat — hence I had to Slice and not shrink. The bluish part of the highlight on the large, black circular disk is also copied from the existing window highlight. This whole lens head forms a complex part of the illustration and it sure wasn't done in ten minutes — as the line illustration should show — but being able to reuse parts in this manner didsave me a lot of time. Xara X's ability to crop Grouped objects is one I find quite invaluable.
Also, since reused parts will contain all the Named Colors attributes previously defined for those objects, making global color changes in parts made of the same "material" becomes really easy. Merely by having copied the original metal tube, I can hereafter subtly fine-tune — or drastically change — the color of all the metal tubes of this kind to whatever color I might later want, thereby insuring a better integration of these parts with the rest of the illustration. Proper visual integration of all parts is of course vital for creating any successful picture — and so this is yet another area where Xara X really shines.
A Shapely Body
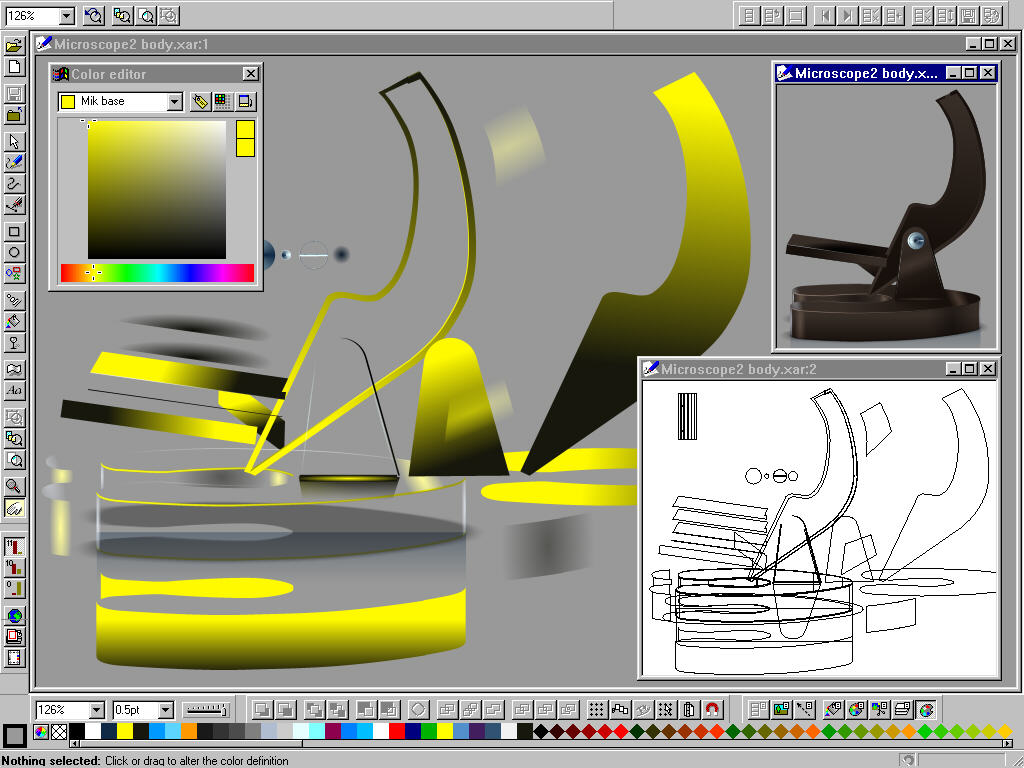
The dark, brown-black body of the microscope contains a lot of subtle, "photographic" shading. To produce this in an ordinary vector program would — if possible at all — entail making a lot of highly complex blends between vector shapes. Yet the body contains very few such blends: only the highlights on the edges of the horseshoe-shaped foot and the soft shadow around its base (on the "floor") employs blends. All the other shading has been accomplished very economically — in terms of both time and file size — by using Xara X's step-free color gradations and transparency.
As the small outline screen shot shows in an "exploded" way, the basic vector shapes are quite simple and were easily drawn and node-edited with the vector drawing tool. Beginners often find vector drawing to be deeply frustrating, but it is really a simple mechanical skill, only requiring some evenings of patient practice. So my only advice here is: just keep at it! Just remember that Combining, Cropping and Slicing primitives of rectangles and ellipses by can save a lot of time and make your work much more accurate — especially when it comes to drawing complex curves, such as the horse-shoe shaped foot. For that, I mostly combined various very flat ellipses, with only a bit of node editing afterwards. The large, arrow-shaped support was easily freehand drawn and then I just deleted the extraneous nodes which my unsteady mouse-movements had produced. (Yes, this whole illustration was done using just the mouse — no drawing tablet was used, though Xara X supports pressure-sensitive tablets.) Its edge was made by applying an outline and then converting this outline to a shape, which allows it to be filled with the necessary gradated color.
For once the basic vector shapes are all drawn, I can start working on the real "secret" to making realistic vector illustration: how tonal values render the "solidity" of things. For the sake of clarity, I have made all the gradations in the separate shapes run from yellow to black. Later, using Xara X's splendid ability to change and fine tune any Named color, I will change all the yellows to a subtle, dark brown.
The various highlights and shadows are made by cropping the basic body shapes and filling them with gradations of colors. The highligts run from black to yellow and are then made Bleach transparent, whereas the shadows run from black to white and are then made Stained Glass transparent. (Since I have nudge-moved all the numerous objects apart in specific steps, I can easily move them precisely back again.)
Much of the "life" of an illustration lies in the little details, especially how edges are treated. By duplicating an object, moving it only slightly away from the original and then Slicing the bottom object, I end up with a very precise, fine edge-object which I can use fill with a highlighting or shadowing color.
Slogging away with dirt-simple procedures — dirt-simple in Xara X, that is — that's really all there is to this body stuff.
A Flair for Flares

The lens flare effect looks just like a very cool bitmap — or "photographic" — effect, but it is yet another highly unusual implementation of the kind of vector techniques that are possible with Xara X. First, for inspiration, I experimented with some Lens Flare filter effects in Photoshop. Exactly how these filters will look on a bitmap image isn't easy to predict or control, but making such experiments on a small file gave me a good idea of how a lens flare "worked". Once I knew that, I could go ahead and recreate a similar effect in Xara X, but now with all the precision of shape placement and color only provided by a vector tool.
Using Xara X's Quick Shape function, I make one star shape with 12 "arms," then make a smaller copy placed in the center of the first. Coloring the outer, larger star black and the inner one yellow, I then make both "Bleach" transparent and blend them with a suitable number of steps (8-10). However, since I want to have the star end at the edge of the illustration and not run far off on the outside, I need to crop the star — but when cropping any blend group, all of Xara X's "virtual" in-between steps will be converted to actual objects in the file. Therefore, since I don't want that (being a fanatical purist in keeping my Xara X files as small as possible) I first group the two stars and, using a rectangle shape, I crop them off on top and left, ungroup them — and only then apply the blend steps. A smaller copy of the whole star is also made and rotated slightly, producing even more starbursts. (Moral: when in need, steal your own stuff!)
The lens flares are circles with nice, soft edges. The picture here shows the basic steps involved (except with an orange for clarity, instead of the deep blue and a checkered background to show the transparency). Make a copy of a circle, nudge-move it away, blend the two circles and apply a much thicker black outline — as in a. Then apply Bleach Transparency to the whole blend group, as in b and nudge-move the thick circle back to overlapping the thin circle, in c. In d I have just increased the number of steps, to make a smoother and more intense glow.
Finally, some very faint blue and magenta "Bleach" transparent circles were thrown all over, to add some extra pizzazz!
New Global Policy
The globe in my Microscope illustration seems an unlikely baby to have come from a vector program — and yet it is pure vector, with no bitmaps in sight. The basic principle is very simple: blended fractal fills — although in practice it can take a lot of experimenting to get it to look right. In figure 5 we can see the steps involved. In a there are two circles, where the larger one is filled with a dark blue to light blue fractal fill and the smaller one, placed inside the larger but offset a bit, is filled with a dark blue to green fractal fill. The "geometry" of these fills are not identical: the inncer circle has had its fractal pattern enlarged and rotated. When this is properly done, this differnce between the fractal fills will create the "round" cloud-and-land effect when the two objects are blended with multiple steps — as seen in b with only four steps and in c, using 55 steps. In such complex cases, using many blend steps — 50 or more — will make even Xara X's super-fast screen redraw slow to a crawl. Luckily, the Blend function allows you to turn off the anti-aliasing of the blend steps, which will speed up redraw speed a bit without reducing the image quality to any noticable extent. Also, it is a good idea to just apply a small number of blend steps when the work is progressing and only set the blend steps to whatever high number is required when the whole illustration is finished.
The rest is now just a matter of enhancing the roundness of the globe by adding proper lights and darks. In d we see a thin crescent-shaped highlight, on the side of the globe where the big flare in the background would hit it. This gradated edge is a tricky thing to make, but in f we can begin to grasp how it is done. Two very thin crescent shapes — one yellow and one black — are created. These are enclosed objects, not just lines and are made by using one circle, very slightly offset underneath, to Slice off another. They are both made "Bleach" transparent — which makes the black shape invisible — and then blended with a hundred steps or so, making a smooth crescent glow from nothing on the inside of the globe to a sharp glow on the edge, as seen in g. The intensity of the transparency was carefully adjusted, to provide the right kind of edge light. Note that the number of blend steps will drastically change the lightness or darkness of both "Bleach" and "Stained Glass" transparency, because the objects will overlap each other.
Further modelling of the globe is done by using the objects shown at H. This is made by offsetting a circular color gradation, from light blue (in the center) to black, within a globe-sized circle — and of course applying the quite indispensible "Bleach" transparency. Another circle, also in H, has a gradation from white to dark gray, but using "Stained glass" mode. Finally, the faint "atmosphere" circle was made by blending two circles of the same size as the globe, but with the different outline thickness procedure shown in the previous section. These are also "Bleach" transparent, of course — as all "lights" must be.
All together now

Now it's time for putting these elements together, as well as to add a few new ones. Figure 6 shows all the 10 working layers, which I have organized the file into, from bottom to top. A is is the hindmost layer, the gradated sky background, which was made with a multi-color gradation from white to cyan blue to deep blue to black. B is the next layer in the sandwhich — a purple fractal fill pattern with a flat "Bleach" transparency. It creates some subtle "cosmic clouds" variation in the mechanically flat sky background. C will hardly be visible here, I fear, but it's a layer with about two thousand glowing little stars. These are just little circles with a circular gradation from white in the middle to black at the edge, with a flat "Bleach" transparency. I made only one, of course and just copied it; spread a dozen stars around a bit with slightly different sizes and copied that whole group again, etc. (This method was a little cumbersome, of course, but it still took me less than five minutes to make about 2,000 subtly glowing stars.) Then follows several layers with parts we have already looked at in some detail: D is the body of the microscope, E is the globe, F is the lens head, G is the ocular and H is the lens flare. The I layer contains some simple blue sidelights — made with circular "Bleach" transparency — to kick some life into all the underlying elements and to integrate them with a common light source. Even if it is a subtle effect, this is the kind of thing which can matter a lot for the total impression. Finally, on layer j, I made some faint light blue clouds, which hover around the globe area, adding atmosphere and depth — these clouds are of course also simple fractal fills with "Bleach" transparency. Do you now understand why I said the "Bleach" transparency was the most useful for all sorts of neat lighting effects?
When all these layers are viewed together, there we have it: a highly precise and detailed digital air brush illustration! In fact, it is so precise — as the details of the lens head illustration show, for instance — that I could never have matched this accuracy by cutting friskets and brushing in details, almost no matter how large I had made the physical air-brush painting.
Big is beautiful
Applying these principles in other vector programs:
Could I recreate the Microscope illustration in another state-of-the-art vector program — such as CorelDraw 8.0? Simply put: no. For while CorelDraw 8.0 now has all of the features of Xara X, including vector transparency, an illustration of this complexity would make CorelDraw dysfunctional with regard to speed. Even on the fastests PCs available now, it would still be very awkward to try this and impossible in practice. However, CorelDraw has many more "special effects" than Xara X has and some of them are highly useful. I particularly like the ability to globally change the hue, contrast, etc. of all the objects in an illustration. This is a very powerful and useful feature, which I hope Xara X will steal from Big Brother in the next version.
The final Microscope illustration file shown at beginning of this article is only about 65Kb on the hard disk and this slender file can now be used to generate bitmap files — in many file formats — of huge sizes, for razor-sharp, wall-size output. (But in terms of memory usage, the file consumes only a few Megabytes!) Let us briefly indulge in some simple calculations. By default, Xara X has a bitmap export limit of 4,096 by 4,096 pixels. That size will be enough for most uses, as this produces a 48Mb 24-bit file, which — if printed at a "high-class" image resolution of 300 ppi — will produce a flawless print measuring 35 by 35 centimeters. Printed at an image resolution of 200 ppi — quite good enough for most uses — such a file will produce a print measuring 52 by 52 centimeters. But Xara X can do even better, if necessary: simply by using another export DLL file (but one which requires more working memory), images measuring 32,000 by 32,000 pixels can be generated! (At least in theory, if your computer has enough disk space and, more importantly, loads of RAM — as that means a file of nearly 3Gb. At 300 ppi, that would make a print measuring 270 by 270 centimeters.)
Tiny Tips
1. Each node which makes up a vector object (and each anchor point for the color fills) takes up a little bit of screen redraw time. When selecting very many and/or very complex objects, this can affect performance. But merely by grouping objects — yes, even a single one — you can prevent Xara X from having to display the nodes and thus speed up the screen redraw.
2. Using TFFs and BMPs and other uncompressed bitmaps makes Xara X very slow when saving its native XAR files, as the program by default will perform loss-less compression on such data. But merely by using high-quality JPGs you can save huge amounts of bitmap data embedded in native XAR files in almost no time at all, as Xara X will not try to further compress JPG data.
Just as a torture test, I tried generating a 24-bit TIFF file of the Microscope illustration measuring a whopping 15,000 by 22,000 pixels — which produced a 950Mb file! If printed at 300 ppi, it could produce a razor-sharp poster measuring more than 120 by 180 cm! On my old Pentium 200 machine with 128 Mb RAM, Xara X easily churned out that monster file in 30 minutes. This is the largest file I have ever seen and there is just no way I can ever open such a monstrosity on my system in a bitmap editor. However, with Photoshop's QuickEdit function — or PhotoPaint's Partial Load function — it is possible to open just a smaller section of a large file for viewing or editing. So I opened up a "small" 60 Mb section — and the image quality of that section was just as superb as Xara X's bitmap output always is: flawless! Even if such humongous image files are very rarely needed by anyone, I find it reassuring to know that with Xara X this is possible, should the need arise in conjunction with a poster or billboard project. Furthermore, this capability is yet more evidence of the kind of high quality programming which has gone into making Xara X the highly reliable graphics engine it is.
Colorful Advice
But why generate bitmaps for printing — cannot Xara X print directly? It sure can, and as large as A0 format. But the reason I use generated bitmaps is because only this allows for further adjustments of the work in a bitmap editing program — and for making proper CMYK separation TIFF files. For while Xara X can print separations directly, it cannot export CMYK TIFF files — the standard bitmap format for all four color printing. But I recommend that, before converting any such RGB file to CMYK, you always apply a small amount of Color Noise filtering in your bitmap editing program. This will smooth out banding artifacts, which are always increased by CMYK conversion and which will make any illustration with an intended smooth, air-brushed look very bad. Also, some selective manual smoothing may have to be done in some areas. (This is not Xara X's fault as such, but an inherent limitation of the 24-bit color range.)
Concluding Vectorial Postscript
I have showed some of the principles by which Xara X can be used efficiently to create advanced digital illustrations and especially how its transparency functions can create the "softer" effects associated with paint programs — and how Xara X can replace some traditional painting media, such as the airbrush. What Xara X cannot do, however — and what no computer program can ever do, popular wisdom to the contrary — is to implant art skills in the user's head. Computer software will only enable people who "can't draw a straight line" to — draw straight lines! And it will also easily let one do a few more things, such as making perfect ellipses and smooth tones — but it doesn't go much beyond that: a knowledge of perspective, of composition, of color and of light is still required to use those straight lines and ovals and tones to make an acceptable picture of a table with a plate of fruit or anything else.
But for for "traditional" illustrators who already have such skills but want to make the switch to digital tools, Xara X is presently the best vector tool available on any platform.